Calibrating a monitor with software is like measuring a car’s speed by licking a finger and sticking it out the window. — Dr. Rick Womer
After acquiring a high quality monitor, the next step toward accurate image processing is getting your monitor properly calibrated and profiled. But get a good monitor first: In my experience you are much better off using a high quality monitor without calibration/profiling than you are using a budget TN monitor that is calibrated and profiled. Calibration & profiling of a cheap monitor doesn’t help much because the image changes as soon as you move your head an inch! (For information on selecting a good LCD monitor, see my earlier article on this subject.) That said, if you’re serious about photography — particularly publishing your photographs — you have to do both: Get a high quality monitor and have it fully calibrated and profiled. But if your budget is tight I recommend you put your money into the best monitor you can afford (favoring quality over monitor size) and save up to get a calibration/profiling kit later. Don’t even think of trying to calibrate a monitor without a colorimeter: As Dr. Rick says in the quotation at the top of this page, it’s a fool’s errand.
Calibration vs Profiling
If you’ve heard the term “calibrated monitor” you may have noticed that I’ve specified that your monitor must be “calibrated and profiled”. Calibration and profiling are two different things (though related); you need both to be sure your monitor is displaying an accurate representation of the images you’re viewing.
Fortunately, all the hardware/software packages I’m aware of do both calibration and profiling, which is why “calibrated monitor” is often used as shorthand for “calibrated and profiled monitor”. Never the less, I try to avoid this euphemism because of the potential for misunderstanding.

Calibration is the process of making adjustments to your hardware (monitor and graphics card) to produce as accurate output as possible.
Profiling is the creation of a special software file called an ICC profile that precisely describes the output characteristics of your monitor.
Calibration
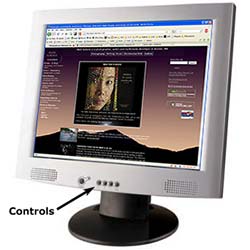
In the old days, monitors usually had mechanical controls (often concealed behind a hinged panel) for their adjustment controls. With current LCD monitors, you generally access calibration controls through a menu system using buttons on the front of the monitor, as shown at right. Monitors produce all the colors they display (their gamut) by combining various values of red, green and blue. Calibration might be thought of as like adjusting the volume of three different sound sources to be equal: In this case you send equal red, green and blue signals and then adjust the controls on your monitor to make them display at equal brightness.
An important limitation is that calibration like this only corrects the red, green and blue signals at one brightness level, and even the best monitors are significantly non-linear in their color responses. That is, if you match red, green and blue levels at low brightness it will throw off accuracy at higher brightness levels. And vice-versa. So how do you correct for this? If you have a good graphics card in your computer, the calibration software may also make changes to what’s called a “look-up table” in the card itself. (This, thankfully, requires no input from end users like you and me.) But that’s still one short of the final step: Profiling.
Profiling
An ICC profile (ICC stands for International Color Consortium) is a data file that precisely describes the output characteristics of your monitor. This profile is then used to correct the non-linearities that simple calibration can’t. In other words, it corrects red, green and blue sensitivity not just at one brightness level (what calibration does), but at all brightness levels that the monitor can produce. You can think of a profile as a kind of filter that your image passes through on its way to the monitor — a filter that corrects for the color inaccuracies of the monitor before the image even reaches it.

Because profiling generates the data necessary for correcting the inaccuracies of the monitor, you might be wondering why it’s necessary to perform calibration as well. The short answer is that image quality may suffer if the profile is asked to do too much; calibration is used to get the monitor “in the ball park” and then a monitor profile is used to finish and fine-tune the job.
Practicalities
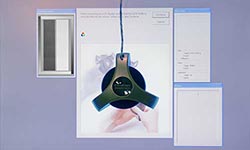
 So now that we’ve established the difference between calibration and profiling and described what each one does, we’ll take a look at how to go about putting this information to work. To start with, you need to get profiling hardware and software. The hardware consists of a device called a colorimeter that you connect to your computer — usually through a USB plug — and place on your monitor to read measure the light (colors) being displayed. The software is used to generate the specific images the colorimeter needs to read. Whatever you do, don’t fall for any “calibration” packages that are software-only (that don’t include a colorimeter). They are completely inadequate for high quality photo printing.
The DataColor “Spyder” and Pantone “Huey” are two well-known colorimeter tools (there are several others) and each one comes with its own software. Sometimes there may be different versions of the software, with more advanced (expensive) versions offering more fine-tuning and control.
Each different device has its own software, with many different versions of each having been released over the years. The adjustments you perform during the calibration part of the process will also vary depending on the kind of controls on your monitor. For these reasons it is impossible to give a detailed description of how to proceed at this point, but I’ll give a general outline of the process and some tips for getting the best results.
- Install the software that came with your colorimeter. Usually, this needs to be done without the colorimeter plugged in to the computer, but read your installation instructions to be sure.
- Be sure your monitor has been on for at least half an hour before beginning — it takes some time for a monitor to warm up and its output to stabilize.
- Re-set all your monitor’s controls (brightness, contrast, etc.) to the factory default settings. If you’ve long since changed the settings and your monitor doesn’t provide a way of restoring the defaults the profiling software will generally have a couple of simple target images to help you set the brightness and contrast of your monitor.
 Plug in the colorimeter and start the profiling software.
- You should work in subdued light to insure that ambient light doesn’t leak through and affect colorimeter readings. Make your room as dark as possible as long as you can still operate the controls on your monitor.
- The profiling software may ask you to choose a White Point — that is, what technical definition of “white” you want to use. This is expressed as a color temperature in Kelvins. You should select 6500K if given this choice.
- Your software may also ask you to select a gamma curve (or just gamma) for your monitor. This affects the transition from total black to pure white on your monitor. You should select a gamma of 2.2 (Even though older versions of Apple Macintosh computers used a gamma of 1.8, modern ones now work best at 2.2)
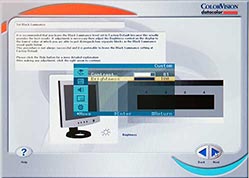
 The software will start with the process of calibration, beginning with some basic readings that don’t require any input from you, followed by some steps in which you will need to make monitor adjustments in response to information from the software. These may be simply brightness and contrast, but if you’re serious about photo printing, you’ve probably purchased a monitor that also has red/green/blue output adjustments, as shown at right.When the RGB part of calibration begins, you will adjust the red, green and blue output levels of your monitor with the goal of getting an equal response from each — in the image above this would result in the red green and blue bars being equal length and all within the proscribed range.
- After brightness, contrast and RGB adjustments are done, calibration is complete. At this point the process of profiling begins. This won’t require any input from you: The software sends out a specific color, the colorimeter reads what comes out of the monitor and generates whatever adjustment factor is needed to correct the color value shown to the color value sent. It repeats this process for a series of colors and saves the results in a profile for your monitor.
After this process is complete, you can shut down the software, unplug the colorimeter and start enjoying your now-much-more-accurate monitor. Solid-state (LCD) monitors change much less over time than CRT displays, but they do change: You will need to repeat the calibration/profiling process at least once a month. Once a week if you do a lot of critical work (especially if you’re sending your image files out to other people for printing or other use). The truly compulsive graphics professionals do it every day.
Executive Summary:
|
To explore this topic, and much more in the area of color management, in detail, I highly recommend “Real World Color Management” by Fraser, Murphy and Bunting. Published by Peachpit Press, ISBN 9780321267221
